Unlocking the Magic of Easy No-Bake 3-Ingredient Coconut Bliss Balls
Are you searching for that perfect sweet treat that requires minimal effort, satisfies your cravings, and accommodates various dietary needs? Look no further! Our recipe for easy no-bake 3-ingredient coconut bliss balls is a true game-changer. These delightful bites of coconut yumminess are not just incredibly simple to whip up; they're also a fantastic solution for busy schedules and allergy-conscious households. Imagine a treat so simple, so quick, yet so utterly delicious and versatile.
In a world often complicated by long ingredient lists and intricate baking steps, these bliss balls stand out as a beacon of simplicity. They are the ideal grab-and-go snack, a delightful addition to lunchboxes, or a guilt-free indulgence to enjoy with your afternoon coffee. What truly sets them apart, beyond their ease, is their inherent allergy-friendliness. Crafted to be vegan, gluten-free, soy-free, peanut-free, and tree nut-free, they offer peace of mind, making them a school-safe and kid-approved treat that everyone can enjoy without worry. This recipe embodies the joy of effortless creation, proving that sometimes, the best things in life (and in the kitchen!) truly are the simplest.
The Secret Trio: Crafting Perfection with Just Three Simple Ingredients
The brilliance of these coconut bliss balls lies in their elegant simplicity. We're talking about a core of just two primary ingredients, with a delightful third optional (but highly recommended!) addition that transforms them into an irresistible indulgence. The secret to their incredible texture and flavor lies in selecting the right components.
The Stars of the Show:
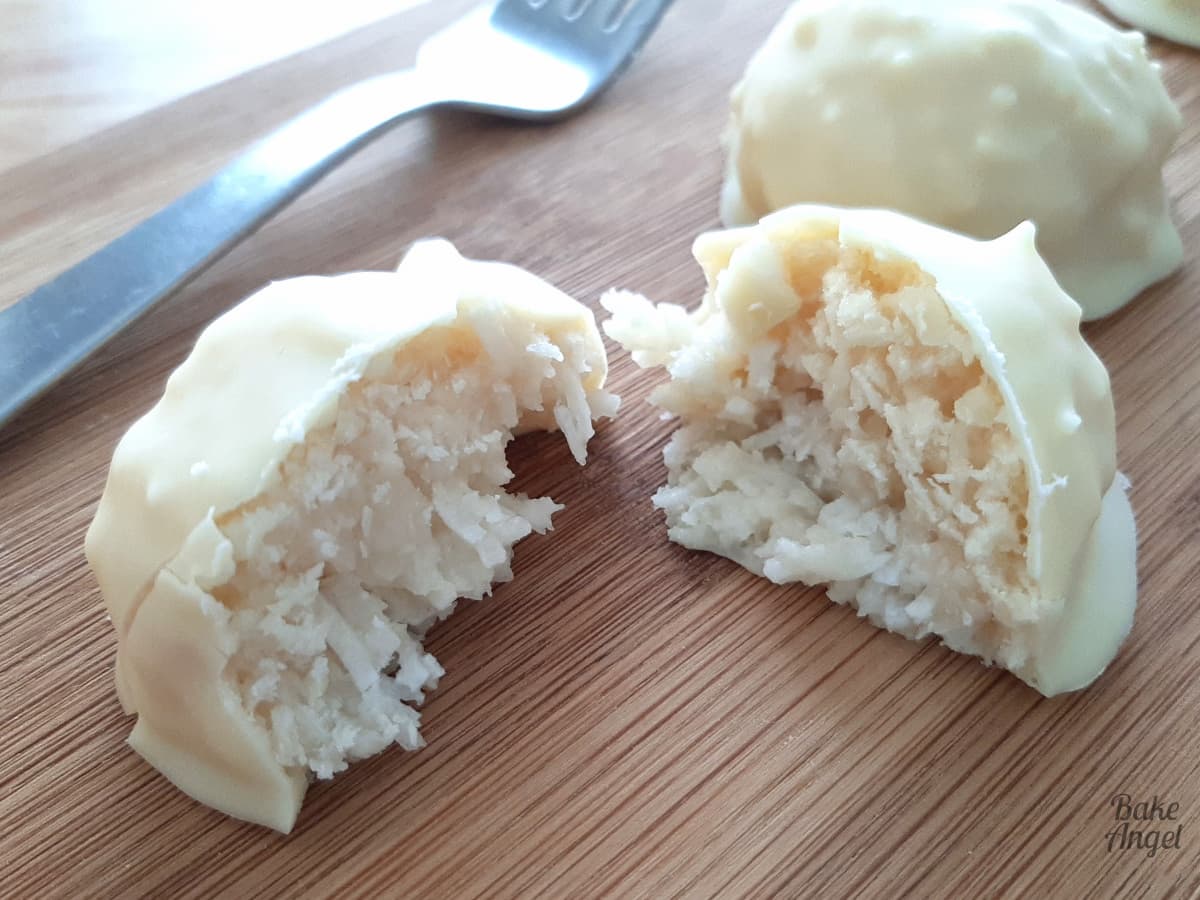
- Shredded Coconut: This is the heart of our bliss balls. For the perfect texture and absorption, opt for shredded coconut rather than fine desiccated coconut. Shredded coconut offers a pleasant chewiness and integrates beautifully with the other ingredients, ensuring your bliss balls aren't too coarse or crumbly. It brings a natural sweetness and aromatic tropical essence that is simply irreplaceable.
- Sweetened Condensed Milk (Coconut or Dairy): This is our magical binder and primary sweetener, responsible for that signature caramelly creaminess and perfectly fudgy consistency.
- For a Vegan & Allergy-Friendly Option: We highly recommend using sweetened coconut condensed milk. It's an incredible pantry staple, offering a rich, sweet, and slightly caramelized flavor that complements the shredded coconut beautifully. It's often free from common allergens and provides a wonderfully versatile base. You'll want about 240ml (1 US Cup) for this recipe.
- Dairy Alternative: If you're not adhering to a vegan diet, traditional dairy sweetened condensed milk can be easily substituted at the same quantity.
- Vegan White Chocolate Chips (Optional, but highly recommended for the "third ingredient" bliss): While technically optional, adding a thin coating of chocolate truly elevates these 3 ingredient healthy coconut bliss balls from great to extraordinary. We love using vegan white chocolate chips, such as those from brands like Enjoy Life, which are specifically designed to be allergy-friendly. However, feel free to use your preferred chocolate – dark chocolate, milk chocolate, or even a different flavor of vegan chocolate chips can work wonderfully. You'll need about 100 grams (1 US Cup) for a generous coating.
The beauty of this simple trio is how harmoniously they come together, proving that sometimes, less truly is more. The quality of these few ingredients will significantly impact the final taste and texture, so choose wisely!
Whip Up Your Batch: Step-by-Step Guide to No-Bake Perfection
Prepare to be amazed by how quickly these delicious treats come together. With only about 10 minutes of active preparation time, you'll be on your way to enjoying these no-bake wonders in no time!
Gather Your Tools and Ingredients:
Before you begin, ensure you have:
- A medium-sized mixing bowl
- A sturdy spatula or spoon
- A small ice cream scoop (optional, but helpful for consistent sizing)
- A baking tray lined with parchment paper or a silicone mat
- A microwave-safe bowl (if adding the chocolate coating)
- Your 200 grams (2 US Cups) of shredded coconut
- Your 240ml (1 US Cup) can of sweetened coconut condensed milk (or dairy equivalent)
- Your 100 grams (1 US Cup) of vegan white chocolate chips (if using)
Mixing and Shaping Your Bliss Balls:
- Combine the Core Ingredients: In your mixing bowl, pour in the entire can of sweetened condensed milk and add the shredded coconut.
- Stir Until Uniform: Using your spatula, stir the mixture together thoroughly. Continue mixing until the coconut is fully saturated and combined with the condensed milk, forming a thick, pliable dough.
- Scoop and Form: Grab your small ice cream scoop (or simply use your hands, which we find often works best!). Scoop out portions of the mixture and roll them between your palms into uniform balls, about 1 to 1.5 inches in diameter.
- Arrange for Chilling: Place the shaped bliss balls onto your lined baking tray, leaving a little space between each one.
The Chilling Phase: Crucial for Success:
Once all your balls are formed, place the baking tray into the fridge. Allow them to chill for at least 30 minutes to an hour, or until they are firm to the touch. This step is essential as it helps the balls set and hold their shape, making them easier to handle and ensuring a delightful, firm texture.
Elevating with a Chocolate Dip (Optional but Recommended!):
If you're opting for the glorious chocolate coating:
- Melt the Chocolate: Place your 100 grams (1 US Cup) of vegan white chocolate chips into a microwave-safe bowl. Heat in the microwave in 30-second intervals, stirring well after each interval, until the chocolate is completely melted and smooth. Be careful not to overheat it, as white chocolate can seize easily.
- Dip the Bliss Balls: Once the bliss balls are firm and the chocolate is melted, use a fork or a toothpick to dip each coconut ball into the melted chocolate. Ensure all sides are evenly coated, allowing any excess chocolate to drip off before placing it back onto the lined baking tray.
Setting and Savoring Your Creation:
Return the chocolate-coated bliss balls to the fridge (or even the freezer for a quicker set) for another 15-20 minutes, or until the chocolate coating has fully set and hardened. Once set, they are ready to be devoured! Admire their lovely appearance, with a perfect thin layer of chocolate encasing the wonderfully textured coconut interior. You'll be absolutely delighted by the first bite!
Tips, Tricks, and Customization for Your Coconut Bliss Balls
These 3 ingredient healthy coconut bliss balls are incredibly versatile. Here are some extra insights and ideas to make them even more perfect for you:
Storage and Shelf Life:
- Fridge: Store your bliss balls in an airtight container in the refrigerator for up to 1-2 weeks.
- Freezer: For longer storage, flash-freeze them on a baking sheet until solid, then transfer them to a freezer-safe bag or container. They can last in the freezer for up to 2-3 months. Thaw them in the fridge for a few hours before enjoying, or eat them frozen for a firmer, chewier treat!
Serving Suggestions:
- Enjoy them as a quick snack on their own.
- Serve them as a light dessert after dinner with a cup of tea or coffee.
- Pack them in lunchboxes for a satisfying and allergy-friendly treat.
- Arrange them on a platter for parties – they always disappear quickly!
Customization and Variations (Staying True to Simplicity):
- Beyond White Chocolate: If you're using the chocolate coating, consider melting dark chocolate for a richer flavor contrast, or even a dairy-free "milk" chocolate for a classic taste. A drizzle of chocolate can also be an elegant touch instead of a full dip.
- A Hint of Flavor: While this recipe champions three ingredients, adding a tiny dash of vanilla extract (a 4th ingredient, but often considered a pantry staple) to the coconut mixture can enhance the flavor profile. Almond extract would also be delightful.
- Toasted Coconut: For an extra layer of flavor and aroma, lightly toast a portion of your shredded coconut in a dry pan before mixing. Let it cool completely before incorporating. This adds a beautiful golden color and a nuttier flavor without adding actual nuts.
- Decorative Touches: Before the chocolate sets, sprinkle with a pinch of sea salt for a sweet and salty contrast, or a dash of edible glitter for a festive look.
- Coconut Snowballs: For a truly minimalist approach, simply roll the finished (and chilled) bliss balls in extra shredded coconut instead of dipping them in chocolate. This provides a lovely "snowball" aesthetic and intensifies the coconut flavor.
Why These Bliss Balls Are a Must-Try for Busy Households and Allergy-Conscious Eaters
These easy no-bake 3-ingredient coconut bliss balls are more than just a recipe; they're a lifestyle solution. For parents navigating school lunch restrictions and playdate dietary concerns, they offer invaluable peace of mind. Knowing you can quickly create a delicious, safe, and wholesome treat for your kids is truly empowering.
Beyond allergies, their no-bake nature means no oven preheating, no waiting, and fewer dishes to wash – a dream for anyone with a packed schedule. They stand as a testament to the idea that "healthy" doesn't have to mean bland or complicated. By utilizing simple, real ingredients, you're crafting a treat that's naturally gluten-free and can easily be vegan, providing a sweet fix without relying on heavily processed components or refined sugars, depending on your choice of condensed milk.
They truly are the perfect marriage of convenience, health, and undeniable flavor. So go ahead, treat yourself and your loved ones to these irresistible bites. We're confident that once you try them, they'll become a beloved staple in your kitchen!
